React Navigation
このガイドでは、Ionic と React で構築されたアプリでのルーティングの仕組みについて説明します。
IonReactRouter は一般的な React Router ライブラリを内部で使用しています。Ionic と React Router を使うことで、ページ遷移がリッチなマルチページアプリをつくることができます。
React Router を使用したルーティングについて知っていることはすべて、Ionic React で利用することができます。Ionic React アプリの基本と、ルーティングがどのように機能するかを見てみましょう。
Ionic React におけるルーティング
これは App コンポーネントのサンプルで、 "/dashboard" URL への単一ルートを定義しています。"/dashboard"にアクセスすると、 DashboardPage コンポーネントをレンダリングします。
App.tsx
const App: React.FC = () => (
  <IonApp>
    <IonReactRouter>
      <IonRouterOutlet>
        <Route path="/dashboard" component={DashboardPage} />
        <Redirect exact from="/" to="/dashboard" />
      </IonRouterOutlet>
    </IonReactRouter>
  </IonApp>
);
Route の直後に、デフォルトの Redirect を定義します。これは、ユーザーがアプリのルート URL("/")にアクセスすると、"/dashboard" URL にリダイレクトします。
リダイレクトには exact という prop もあります。つまり、このルートが一致するためには、URL が from prop(もしくは Route で exact が使われている場合の path prop)と正確に一致する必要があります。すべてのルートは"/"で始まるため、これがないと、このリダイレクトはすべてのルートに対してレンダリングされます。
ユーザーが認証されているかどうかを確認するなど、条件に基づいてルートの render メソッドからプログラムでリダイレクトすることもできます:
<Route
  exact
  path="/dashboard"
  render={(props) => {
    return isAuthed ? <DashboardPage {...props} /> : <LoginPage />;
  }}
/>
IonReactRouter
IonReactRouter コンポーネントは、React Router の従来の BrowserRouter コンポーネントをラップし、アプリケーションをルーティング用にセットアップします。したがって�、 BrowserRouter の代わりに IonReactRouter を使用します。任意の prop を IonReactRouter に渡すことができ、それらはベースとなる BrowserRouter に渡されます。
ルーターのネスト
DashboardPage 内で、アプリのこの特定のセクションに関連するルートをさらに定義します。
DashboardPage.tsx
const DashboardPage: React.FC = () => {
  return (
    <IonPage>
      <IonRouterOutlet>
        <Route exact path="/dashboard" component={UsersListPage} />
        <Route path="/dashboard/users/:id" component={UserDetailPage} />
      </IonRouterOutlet>
    </IonPage>
  );
};
ここでは、アプリの DashboardPage から更にコンポーネントが定義された 2 つのルートがあります。path にはルートの全体を定義する必要があり、その URL からこのページに到達した場合でも、 "/dashboard" を省略できないことに注意してください。 React Router は絶対パスを必要とし、相対パスはサポートされていません。
ただし、 match オブジェクトの url プロパティを使用して、コンポーネントをレンダリングするために match した URL を提供できます。これは、ネストされたルートを操作するときに役立ちます。
const DashboardPage: React.FC<RouteComponentProps> = ({ match }) => {
  return (
    <IonPage>
      <IonRouterOutlet>
        <Route exact path={match.url} component={UsersListPage} />
        <Route path={`${match.url}/users/:id`} component={UserDetailPage} />
      </IonRouterOutlet>
    </IonPage>
  );
};
ここでは、 match.url には "/dashboard" の値が含まれています。これは、 DashboardPage のレンダリングに使用される URL であるためです。
これらのルートは IonRouterOutlet にグループ化されています。次に説明します。
IonRouterOutlet
IonRouterOutlet コンポーネントは、Ionic の "ページ" をレンダリングするルートコンテナを提供します。 ページが IonRouterOutlet にある場合、コンテナはページ間の遷移アニメーションを制御し、ページが作成および破棄されるタイミングを制御します。これにより、ビューを切り替える際にビュー間の状態を維持できます。
上記の DashboardPage には、ユーザーリストページと詳細ページが表示されます。 2 つのページ間を移動するとき、 IonRouterOutlet は適切なプラットフォームページの遷移を提供し、前のページの状態をそのまま保持するため、ユーザーがリストページに戻ると、前のページと同じ状態で表示されます。
IonRouterOutlet には、 Route と Redirect のみを含める必要があります。 他のコンポーネントは、 Route の結果、または IonRouterOutlet の外部でレンダリングする必要があります。
Fallback Route
A common routing use case is to provide a "fallback" route to be rendered in the event the location navigated to does not match any of the routes defined.
We can define a fallback route by placing a Route component without a path property as the last route defined within an IonRouterOutlet.
DashboardPage.tsx
const DashboardPage: React.FC<RouteComponentProps> = ({ match }) => {
  return (
    <IonRouterOutlet>
      <Route exact path={match.url} component={UsersListPage} />
      <Route path={`${match.url}/users/:id`} component={UserDetailPage} />
      <Route render={() => <Redirect to={match.url} />} />
    </IonRouterOutlet>
  );
};
Here, we see that in the event a location does not match the first two Routes the IonRouterOutlet will redirect the Ionic React app to the match.url path.
You can alternatively supply a component to render instead of providing a redirect.
const DashboardPage: React.FC<RouteComponentProps> = ({ match }) => {
  return (
    <IonRouterOutlet>
      <Route exact path={match.url} component={UsersListPage} />
      <Route path={`${match.url}/users/:id`} component={UserDetailPage} />
      <Route component={NotFoundPage} />
    </IonRouterOutlet>
  );
};
IonPage
The IonPage component wraps each view in an Ionic React app and allows page transitions and stack navigation to work properly. Each view that is navigated to using the router must include an IonPage component.
import { IonContent, IonHeader, IonPage, IonTitle, IonToolbar } from '@ionic/react';
import React from 'react';

const Home: React.FC = () => {
  return (
    <IonPage>
      <IonHeader>
        <IonToolbar>
          <IonTitle>Home</IonTitle>
        </IonToolbar>
      </IonHeader>
      <IonContent className="ion-padding">Hello World</IonContent>
    </IonPage>
  );
};
export default Home;
Navigation
Ionic React アプリでさまざまなビューにルーティングする場合、いくつかのオプシ�ョンを使用できます。 ここで、 UsersListPageはIonItem は IonItem の routerLink prop を使用して、タップ/クリックされたときに移動するルートを指定します:
UsersListPage.tsx
const UsersListPage: React.FC = () => {
  return (
    <IonPage>
      <IonHeader>
        <IonToolbar>
          <IonTitle>Users</IonTitle>
        </IonToolbar>
      </IonHeader>
      <IonContent>
        <IonList>
          <IonItem routerLink="/dashboard/users/1">
            <IonLabel>User 1</IonLabel>
          </IonItem>
          <IonItem routerLink="/dashboard/users/2">
            <IonLabel>User 2</IonLabel>
          </IonItem>
        </IonList>
      </IonContent>
    </IonPage>
  );
};
Other components that have the routerLink prop are IonButton, IonCard, IonRouterLink, IonFabButton, and IonItemOption.
Each of these components also have a routerDirection prop to explicitly set the type of page transition to use ("back", "forward", or "none").
Outside of these components that have the routerLink prop, you can also use React Routers Link component to navigate between views:
<Link to="/dashboard/users/1">User 1</Link>
ルーティングは可能な限り、上記の方法のいずれかを使用することをお勧めします。 これらのアプローチの利点は、両方ともアンカー( <a> )タグをレンダリングすることです。これはアプリ全体のアクセシビリティに適しています。
ナビゲーションのためのプログラムオプションとして、React Router がルート経由でレンダリングするコンポーネントに提供する history prop を使用することもできます。
<IonButton
  onClick={(e) => {
    e.preventDefault();
    history.push('/dashboard/users/1');
  }}
>
  Go to User 1
</IonButton>
history is a prop.
Navigating using history.go
React Router uses the history package which has a history.go method that allows developers to move forward or backward through the application history. Let's take a look at an example.
Say you have the following application history:
/pageA --> /pageB --> /pageC
If you were to call router.go(-2) on /pageC, you would be brought back to /pageA. If you then called router.go(2), you would be brought to /pageC.
Using history.go() in Ionic React is not supported at the moment. Interested in seeing support for this get added to Ionic React? Let us know on GitHub!
URL Parameters
Dashboard Page で定義された 2 番目のルートには、URL パラメーターが定義されています(パスの ":id" 部分)。 URL パラメーターは path の動的な部分であり、ユーザーが "/dashboard/users/1" などの URL に移動すると、"1" はルートがレンダリングするコンポーネント上で "id" という名前のパラメーターに保存されます。それがどのように行われるかを見てみましょう。
UserDetailPage.tsx
interface UserDetailPageProps
  extends RouteComponentProps<{
    id: string;
  }> {}

const UserDetailPage: React.FC<UserDetailPageProps> = ({ match }) => {
  return (
    <IonPage>
      <IonHeader>
        <IonToolbar>
          <IonTitle>User Detail</IonTitle>
        </IonToolbar>
      </IonHeader>
      <IonContent>User {match.params.id}</IonContent>
    </IonPage>
  );
};
match prop には、URL パラメーターなど、一致したルートに関する情報が含まれます。 ここで id パラメータを取得し、画面�に表示します。
Note: TypeScript インターフェイスを使用して props オブジェクトを厳密に入力する方法に注意してください。 このインターフェースにより、コンポーネント内部でタイプセーフティとコード補完が可能になります。
Linear Routing versus Non-Linear Routing
Linear Routing
If you have built a web app that uses routing, you likely have used linear routing before. Linear routing means that you can move forward or backward through the application history by pushing and popping pages.
The following is an example of linear routing in a mobile app:
The application history in this example has the following path:
Accessibility --> VoiceOver --> Speech
When we press the back button, we follow that same routing path except in reverse. Linear routing is helpful in that it allows for simple and predictable routing behaviors.
The downside of linear routing is that it does not allow for complex user experiences such as tab views. This is where non-linear routing comes into play.
Non-Linear Routing
Non-linear routing is a concept that may be new to many web developers learning to build mobile apps with Ionic.
Non-linear routing means that the view that the user should go back to is not necessarily the previous view that was displayed on the screen.
The following is an example of non-linear routing:
In the example above, we start on the Originals tab. Tapping a card brings us to the Ted Lasso view within the Originals tab.
From here, we switch to the Search tab. Then, we tap the Originals tab again and are brought back to the Ted Lasso view. At this point, we have started using non-linear routing.
Why is this non-linear routing? The previous view we were on was the Search view. However, pressing the back button on the Ted Lasso view should bring us back to the root Originals view. This happens because each tab in a mobile app is treated as its own stack. The Working with Tabs sections goes over this in more detail.
If tapping the back button simply called history.go(-1) from the Ted Lasso view, we would be brought back to the Search view which is not correct.
Non-linear routing allows for sophisticated user flows that linear routing cannot handle. However, certain linear routing APIs such as history.go() cannot be used in this non-linear environment. This means that history.go() should not be used when using tabs or nested outlets.
Which one should I choose?
We recommend keeping your application as simple as possible until you need to add non-linear routing. Non-linear routing is very powerful, but it also adds a considerable amount of complexity to mobile applications.
The two most common uses of non-linear routing is with tabs and nested IonRouterOutlets. We recommend only using non-linear routing if your application meets the tabs or nested router outlet use cases.
For more on tabs, please see Working with Tabs.
For more on nested router outlets, please see Nested Routes.
Shared URLs versus Nested Routes
A common point of confusion when setting up routing is deciding between shared URLs or nested routes. This part of the guide will explain both and help you decide which one to use.
Shared URLs
Shared URLs is a route configuration where routes have pieces of the URL in common. The following is an example of a shared URL configuration:
const App: React.FC = () => (
  <IonApp>
    <IonReactRouter>
      <IonRouterOutlet>
        <Route path="/dashboard" exact={true}>
          <DashboardMainPage />
        </Route>
        <Route path="/dashboard/stats" exact={true}>
          <DashboardStatsPage />
        </Route>
      </IonRouterOutlet>
    </IonReactRouter>
  </IonApp>
);
The above routes are considered "shared" because they reuse the dashboard piece of the URL.
Nested Routes
Nested Routes is a route configuration where routes are listed as children of other routes. The following is an example of a nested route configuration:
const App: React.FC = () => (
  <IonApp>
    <IonReactRouter>
      <IonRouterOutlet>
        <Route path="/dashboard/:id">
          <DashboardRouterOutlet />
        </Route>
      </IonRouterOutlet>
    </IonReactRouter>
  </IonApp>
);

const DashboardRouterOutlet: React.FC = () => (
  <IonRouterOutlet>
    <Route path="/dashboard" exact={true}>
      <DashboardMainPage />
    </Route>
    <Route path="/dashboard/stats" exact={true}>
      <DashboardStatsPage />
    </Route>
  </IonRouterOutlet>
);
The above routes are nested because they are in the children array of the parent route. Notice that the parent route renders the DashboardRouterOutlet component. When you nest routes, you need to render another instance of IonRouterOutlet.
Which one should I choose?
Shared URLs are great when you want to transition from page A to page B while preserving the relationship between the two pages in the URL. In our previous example, a button on the /dashboard page could transition to the /dashboard/stats page. The relationship between the two pages is preserved because of a) the page transition and b) the url.
Nested routes should be used when you want to render content in outlet A while also rendering sub-content inside of a nested outlet B. The most common use case you will run into is tabs. When you load up a tabs Ionic starter application, you will see IonTabBar and IonTabs components rendered in the first IonRouterOutlet. The IonTabs component renders another IonRouterOutlet which is responsible for rendering the contents of each tab.
There are very few use cases in which nested routes make sense in mobile applications. When in doubt, use the shared URL route configuration. We strongly caution against using nested routing in contexts other than tabs as it can quickly make navigating your app confusing.
Working with Tabs
When working with tabs, Ionic needs a way to know which view belongs to which tab. The IonTabs component comes in handy here, but let's look at what the routing setup for this looks like:
<IonApp>
  <IonReactRouter>
    <IonRouterOutlet>
      <Route path="/tabs" render={() => <Tabs />} />
      <Route exact path="/">
        <Redirect to="/tabs" />
      </Route>
    </IonRouterOutlet>
  </IonReactRouter>
</IonApp>
Here, our tabs path loads a Tabs component. We provide each tab as a route object inside of this component. In this example, we call the path tabs, but this can be customized.
Let's start by taking a look at our Tabs component:
import { Redirect, Route } from 'react-router-dom';
import { IonIcon, IonLabel, IonRouterOutlet, IonTabBar, IonTabButton, IonTabs } from '@ionic/react';
import { IonReactRouter } from '@ionic/react-router';
import { ellipse, square, triangle } from 'ionicons/icons';
import Tab1 from './pages/Tab1';
import Tab2 from './pages/Tab2';
import Tab3 from './pages/Tab3';

const Tabs: React.FC = () => (
  <IonTabs>
    <IonRouterOutlet>
      <Redirect exact path="/tabs" to="/tabs/tab1" />
      <Route exact path="/tabs/tab1">
        <Tab1 />
      </Route>
      <Route exact path="/tabs/tab2">
        <Tab2 />
      </Route>
      <Route path="/tabs/tab3">
        <Tab3 />
      </Route>
      <Route exact path="/tabs">
        <Redirect to="/tabs/tab1" />
      </Route>
    </IonRouterOutlet>
    <IonTabBar slot="bottom">
      <IonTabButton tab="tab1" href="/tabs/tab1">
        <IonIcon icon={triangle} />
        <IonLabel>Tab 1</IonLabel>
      </IonTabButton>
      <IonTabButton tab="tab2" href="/tabs/tab2">
        <IonIcon icon={ellipse} />
        <IonLabel>Tab 2</IonLabel>
      </IonTabButton>
      <IonTabButton tab="tab3" href="/tabs/tab3">
        <IonIcon icon={square} />
        <IonLabel>Tab 3</IonLabel>
      </IonTabButton>
    </IonTabBar>
  </IonTabs>
);

export default Tabs;
If you have worked with Ionic Framework before, this should feel familiar. We create an IonTabs component and provide an IonTabBar. The IonTabBar provides IonTabButton components, each with a tab property that is associated with its corresponding tab in the router config. We also provide an IonRouterOutlet to give IonTabs an outlet to render the different tab views in.
IonTabs renders an IonPage for you, so you do not need to add IonPage manually here.
How Tabs in Ionic Work
Each tab in Ionic is treated as an individual navigation stack. This means if you have three tabs in your application, each tab has its own navigation stack. Within each stack you can navigate forwards (push a view) and backwards (pop a view).
This behavior is important to note as it is different than most tab implementations that are found in other web based UI libraries. Other libraries typically manage tabs as one single history stack.
Since Ionic is focused on helping developers build mobile apps, the tabs in Ionic are designed to match native mobile tabs as closely as possible. As a result, there may be certain behaviors in Ionic's tabs that differ from tabs implementations you have seen in other UI libraries. Read on to learn more about some of these differences.
Child Routes within Tabs
When adding additional routes to tabs you should write them as sibling routes with the parent tab as the path prefix. The example below defines the /tabs/tab1/view route as a sibling of the /tabs/tab1 route. Since this new route has the tab1 prefix, it will be rendered inside of the Tabs component, and Tab 1 will still be selected in the IonTabBar.
<IonTabs>
  <IonRouterOutlet>
    <Redirect exact path="/tabs" to="/tabs/tab1" />
    <Route exact path="/tabs/tab1">
      <Tab1 />
    </Route>
    <Route exact path="/tabs/tab1/view">
      <Tab1View />
    </Route>
    <Route exact path="/tabs/tab2">
      <Tab2 />
    </Route>
    <Route path="/tabs/tab3">
      <Tab3 />
    </Route>
    <Route exact path="/tabs">
      <Redirect to="/tabs/tab1" />
    </Route>
  </IonRouterOutlet>
  <IonTabBar slot="bottom">
    <IonTabButton tab="tab1" href="/tabs/tab1">
      <IonIcon icon={triangle} />
      <IonLabel>Tab 1</IonLabel>
    </IonTabButton>
    <IonTabButton tab="tab2" href="/tabs/tab2">
      <IonIcon icon={ellipse} />
      <IonLabel>Tab 2</IonLabel>
    </IonTabButton>
    <IonTabButton tab="tab3" href="/tabs/tab3">
      <IonIcon icon={square} />
      <IonLabel>Tab 3</IonLabel>
    </IonTabButton>
  </IonTabBar>
</IonTabs>
Switching Between Tabs
Since each tab is its own navigation stack, it is important to note that these navigation stacks should never interact. This means that there should never be a button in Tab 1 that routes a user to Tab 2. In other words, tabs should only be changed by the user tapping a tab button in the tab bar.
A good example of this in practice is the iOS App Store and Google Play Store mobile applications. These apps both provide tabbed interfaces, but neither one ever routes the user across tabs. For example, the "Games" tab in the iOS App Store app never directs users to the "Search" tab and vice versa.
Let's take a look at a couple common mistakes that are made with tabs.
A Settings Tab That Multiple Tabs Reference
A common practice is to create a Settings view as its own tab. This is great if developers need to present several nested settings menus. However, other tabs should never try to route to the Settings tab. As we mentioned above, the only way that the Settings tab should be activated is by a user tapping the appropriate tab button.
If you find that your tabs need to reference the Settings tab, we recommend making the Settings view a modal by using ion-modal. This is a practice found in the iOS App Store app. With this approach, any tab can present the modal without breaking the mobile tabs pattern of each tab being its own stack.
The example below shows how the iOS App Store app handles presenting an "Account" view from multiple tabs. By presenting the "Account" view in a modal, the app can work within the mobile tabs best practices to show the same view across multiple tabs.
Reusing Views Across Tabs
Another common practice is to present the same view in multiple tabs. Developers often try to do this by having the view contained in a single tab, with other tabs routing to that tab. As we mentioned above, this breaks the mobile tabs pattern and should be avoided.
Instead, we recommend having routes in each tab that reference the same component. This is a practice done in popular apps like Spotify. For example, you can access an album or podcast from the "Home", "Search", and "Your Library" tabs. When accessing the album or podcast, users stay within that tab. The app does this by creating routes per tab and sharing a common component in the codebase.
The example below shows how the Spotify app reuses the same album component to show content in multiple tabs. Notice that each screenshot shows the same album but from a different tab.
| Home Tab | Search Tab |
|---|---|
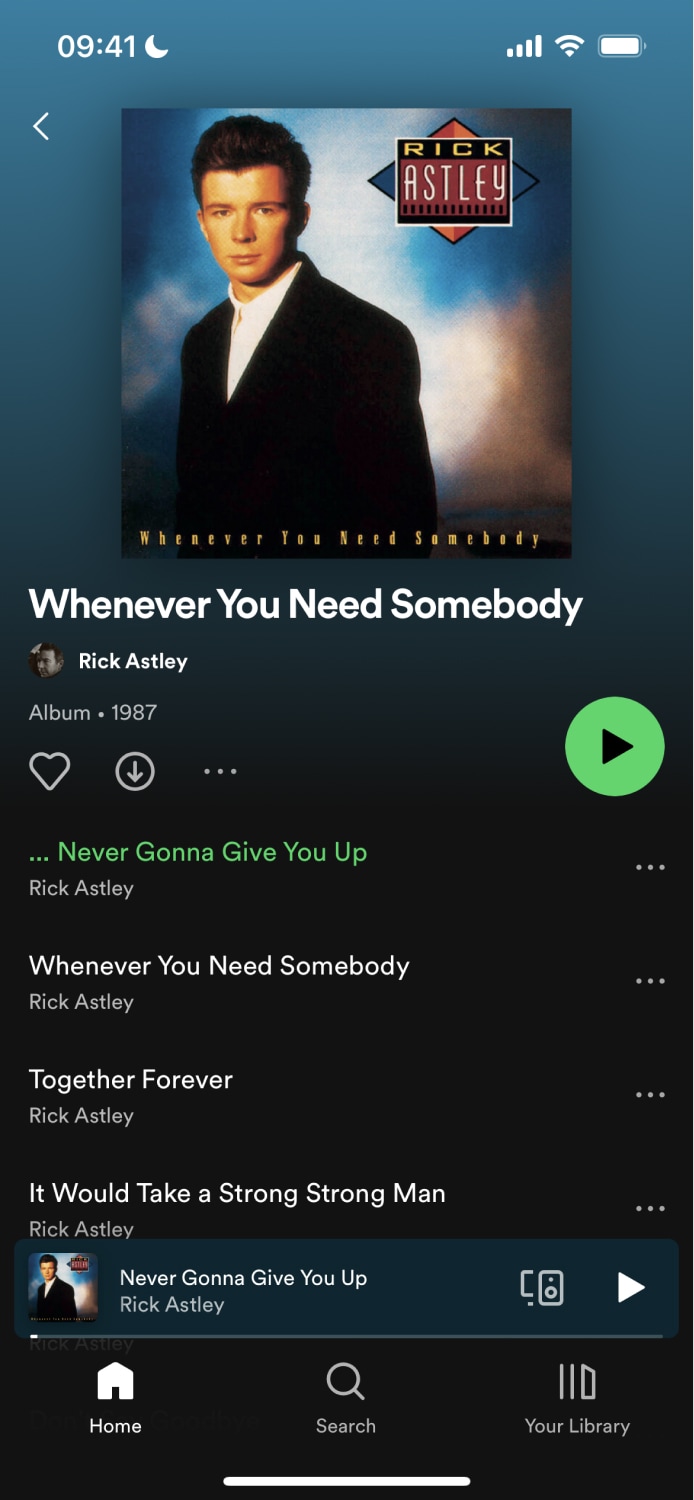 | 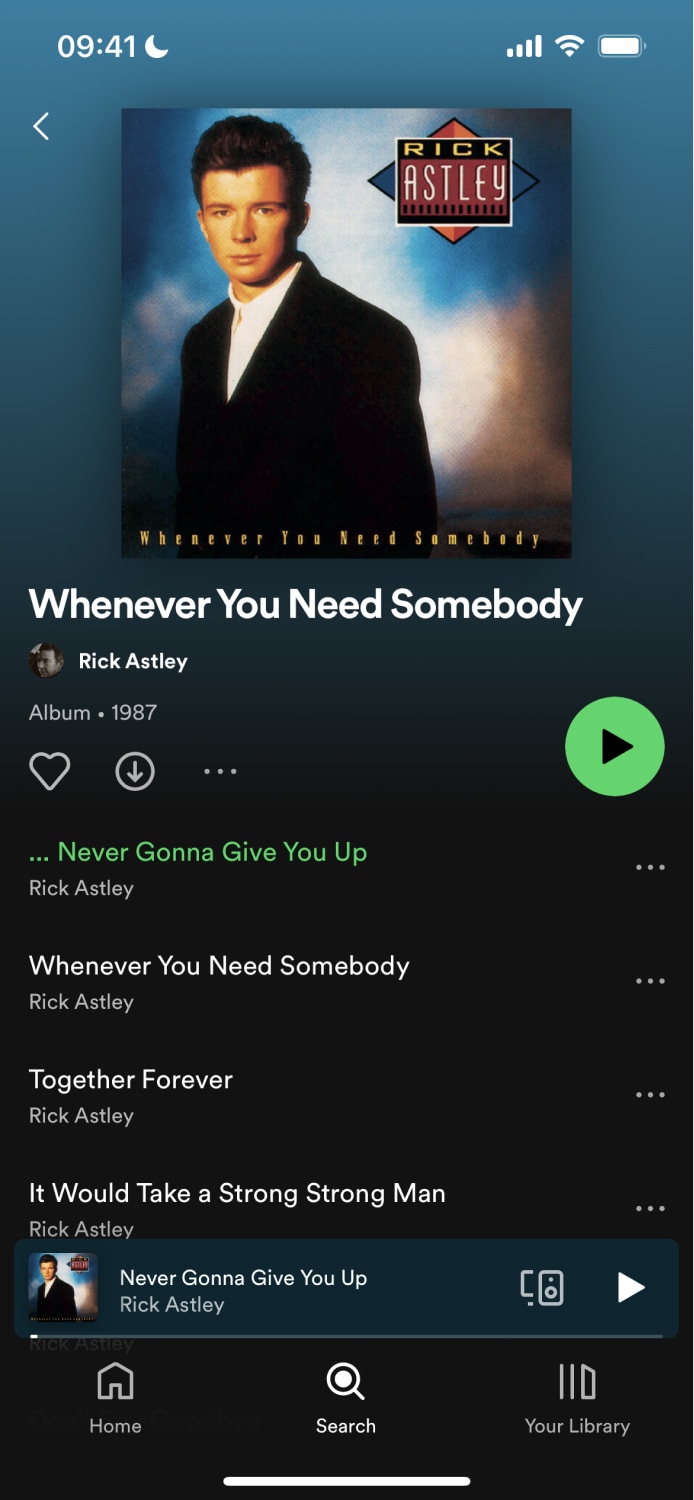 |
Live Example
If you would prefer to get hands on with the concepts and code described above, please checkout our live example of the topics above on StackBlitz.
IonRouterOutlet in a Tabs View
Tab ビューで作業する場合、Ionic React には、どのビューがどの Tab に属しているかを判断する方法が必要です。これは、 Route に提供されるパスが正規表現であるという事実を利用することにより実現します。
この構文は少し不思議に見えますが、理解すればかなり簡単です。
例えば、2 つのタブ (sessions と speakers) をもつビューのルートは次のように設定できます:
<IonRouterOutlet>
  <Route path="/:tab(sessions)" component={SessionsPage} exact={true} />
  <Route path="/:tab(sessions)/:id" component={SessionDetail} />
  <Route path="/:tab(speakers)" component={SpeakerList} exact={true} />
</IonRouterOutlet>
ナビゲートされた URL が "/sessions" の場合、最初のルートと一致します。 "tab" という URL パラメーターに "sessions" の値を格納して、 match オブジェクトに SessionsPage として追加します。
ユーザーがセッションの詳細ページ(たとえば "/sessions/1" )に移動すると、2 番目のルートは "tabs" という URL パラメーターに "sessions" という値を追加します。 IonRouterOutlet は、両方のページが同じ "sessions" タブにあることを認識すると、新しいビューへのアニメーションページ遷移を提供します。 ユーザーが新しいタブ(この場合は "speakers" )に移動すると、 IonRouterOutlet はアニメーションを提供しないことを認識します。
IonRouterOutlet の Switch
IonRouterOutlet は、どのルートをレンダリングするかを決定する仕事を引き継ぐので、React Router の Switch を IonRouterOutlet の内部で使用しても効果はない。スイッチは IonRouterOutlet の外部で使用されても、期待通りに機能します。
Utilities
useIonRouter
The useIonRouter hook can be used for more direct control over routing in Ionic React. It allows you to pass additional metadata to Ionic, such as a custom animation, before calling React Router.
The useIonRouter hook returns a UseIonRouterResult which has several convenience methods for routing:
type UseIonRouterResult = {
  /**
   * Navigates to a new pathname
   * @param pathname - The path to navigate to
   * @param routerDirection - Optional - The RouterDirection to use for transition purposes, defaults to 'forward'
   * @param routeAction - Optional - The RouteAction to use for history purposes, defaults to 'push'
   * @param routerOptions - Optional - Any additional parameters to pass to the router
   * @param animationBuilder - Optional - A custom transition animation to use
   */
  push(
    pathname: string,
    routerDirection?: RouterDirection,
    routeAction?: RouteAction,
    routerOptions?: RouterOptions,
    animationBuilder?: AnimationBuilder
  ): void;
  /**
   * Navigates backwards in history, using the IonRouter to determine history
   * @param animationBuilder - Optional - A custom transition animation to use
   */
  goBack(animationBuilder?: AnimationBuilder): void;
  /**
   * Determines if there are any additional routes in the the Router's history. However, routing is not prevented if the browser's history has more entries. Returns true if more entries exist, false if not.
   */
  canGoBack(): boolean;
  /**
   * Information about the current route.
   */
  routeInfo: RouteInfo;
};
The following example shows how to use useIonRouter:
import { useIonRouter } from '@ionic/react';

const MyComponent: React.FC = () => {
  const router = useIonRouter();
  const goToPage = () => {
    router.push('/my-page', 'root', 'replace');
  };

  ...
}
More Information
React Router を使用した React でのルーティングの詳細については、次の https://reacttraining.com/react-router/web でドキュメントをご覧ください。
From the Community
Ionic 4 and React: Navigation - Paul Halliday